After a recording session is complete and takes have been recorded, the next stage is the editing process. This is when the takes are stitched together. For acoustic, contemporary and classical recordings, an edit plan document is typically created and shared with the engineer to facilitate the assembly of the different takes.
Over the past decade, through numerous album and video projects, and my studies at McGill University’s sound recording tonmeister inspired program, I’ve come to believe that a guide explaining an efficient and effective workflow would be beneficial. This guide would outline the steps involved in creating an editing plan, ensuring a smooth and efficient completion of the editing stage.
Before we dive in:
Here are three important considerations before we begin:
- Every project is unique and this is meant to be a general guide. The approach may vary depending on the context or the artist’s preferences. For instance, a project might not even have a score or the artist may have a proven other method in their past recordings which would need to be taken into consideration.
- There are many ways to make an edit plan. This approach reflects my experience and lessons learned from successful projects, and is intended to offer a useful approach rather than a required method.
- If a record producer is involved, they often prepare the take sheet and edit plan. Check in with them about their process. One of the joys of working with a great producer is that they handle this work for you.
The edit plan is created by listening back to the takes after the recording session. The document can be a marked up score or a table (i.e. spreadsheet) with timings or both!
Music recordings that have no sheet music, can still have a take sheet document. This document keeps track of the take numbers and what was recorded in each one and any performance notes.
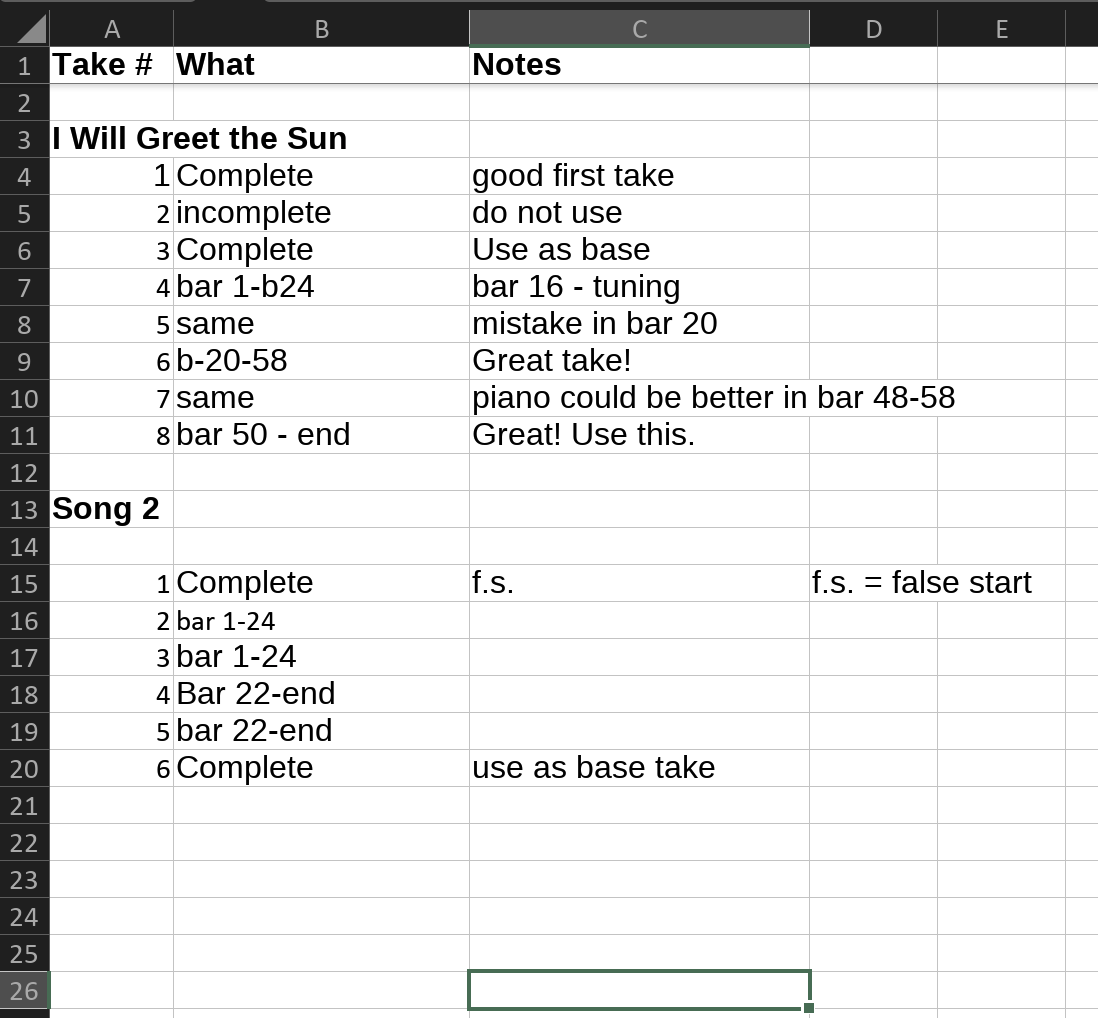
Example of a mock take sheet on OnlyOffice (similar to Google Sheets). Feel free to download and use as you wish.
https://docspace-lltugb.onlyoffice.com/s/SWWyw8YZ5FJQP-C
It is important that if there are different personnel involved (i.e. band leader, videographer, producer) that they are all on the same page with the take numbers and the audio files names are in sync with that and the slate. This is one of the reasons I created a free tool that displays the take numbers in the studio called What Take Is It?
Listening back to the takes
As you are listening back to the takes, there are some useful ways to mark the score. Start by looking at the take sheet. This can give you a good overall view of the number of takes available and if any remarks noted were possible. There is no need to listen to ALL of the takes and in fact I discourage this as it can create fatigue, discouragement, and take a much longer time than needed. Start with the best available take and if there is a problem listen to another one for its solution.
You can make your own markings in the take sheet or on the score. You can use abbreviated shorthand marks with the take number to make it easier to remember. Some example include:
- T1+ = means take 1 was great for this section or bar
- T4- = means take 4 was not a good take
- [T7 = take 7 starts here
- T7] = take 7 ends here
For repeats, one can use A or B at the end of the number for example:
- T9B- = in the repeat of take 9 this bar had a problem.
You can also use different colours for each take if you find that helpful.
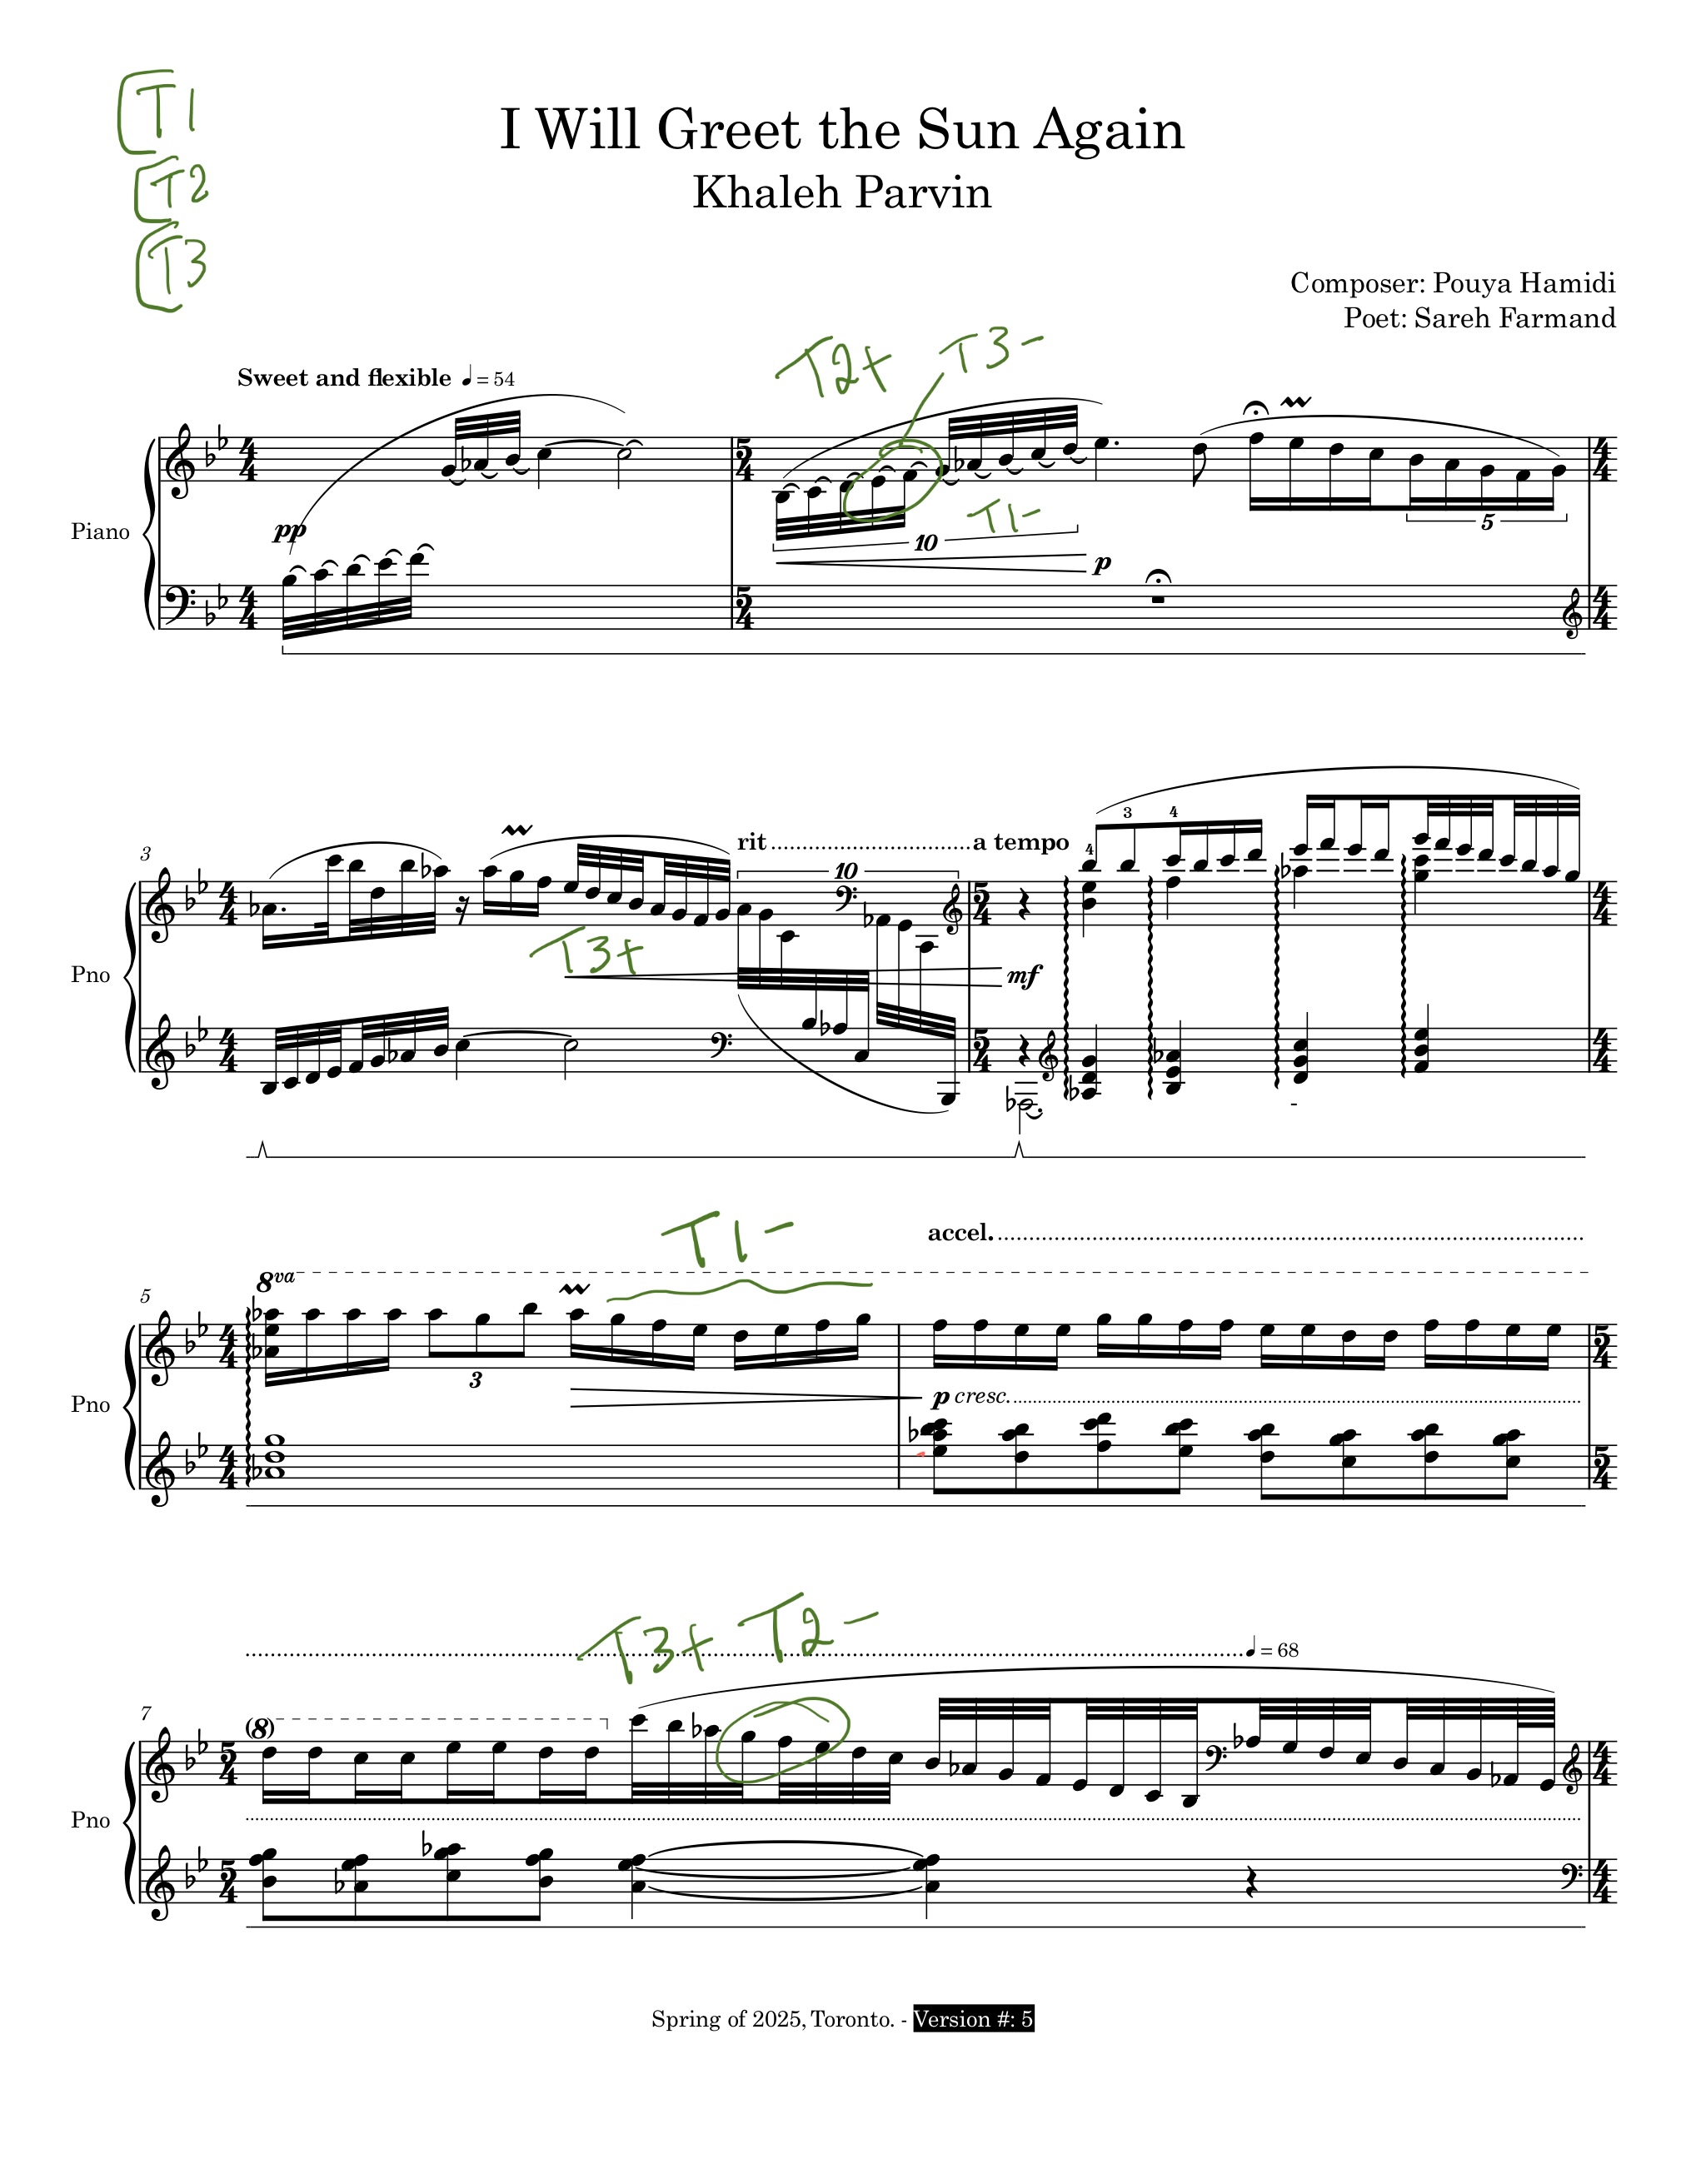
What to give to the editing engineer
As you determine what take to use where, this is where you can indicate HOW to the engineer. There are two primary ways here:
- Sending a marked up score with BIG T markings on where the takes should be
stitched together. - Sending the engineer a spreadsheet with the indication of takes and timings.
If possible, I highly recommend putting the timecode of the audio take in the score or spreadsheet document. This way the engineer can quickly input the indicated timing into the DAW (audio program) and save you a lot of billed hours scrubbing for the audio. The timing does not need to be exact. It can be a second or two off.
Marked score edit plan:
If your handwriting is hard to read or there is not enough room in the score to write the timings by hand, I recommend typing the timing numbers into the score. This way it will avoid possible confusion by the engineer.
Below is an example of marked score using T markings. It is important to indicate the outgoing take and incoming take to clear less confusion for the engineer. It is also important to make the T marking super obvious! There have been occasions where the indication was vague or not clearly marked. The T marking should go all the way to the button of the bar line.
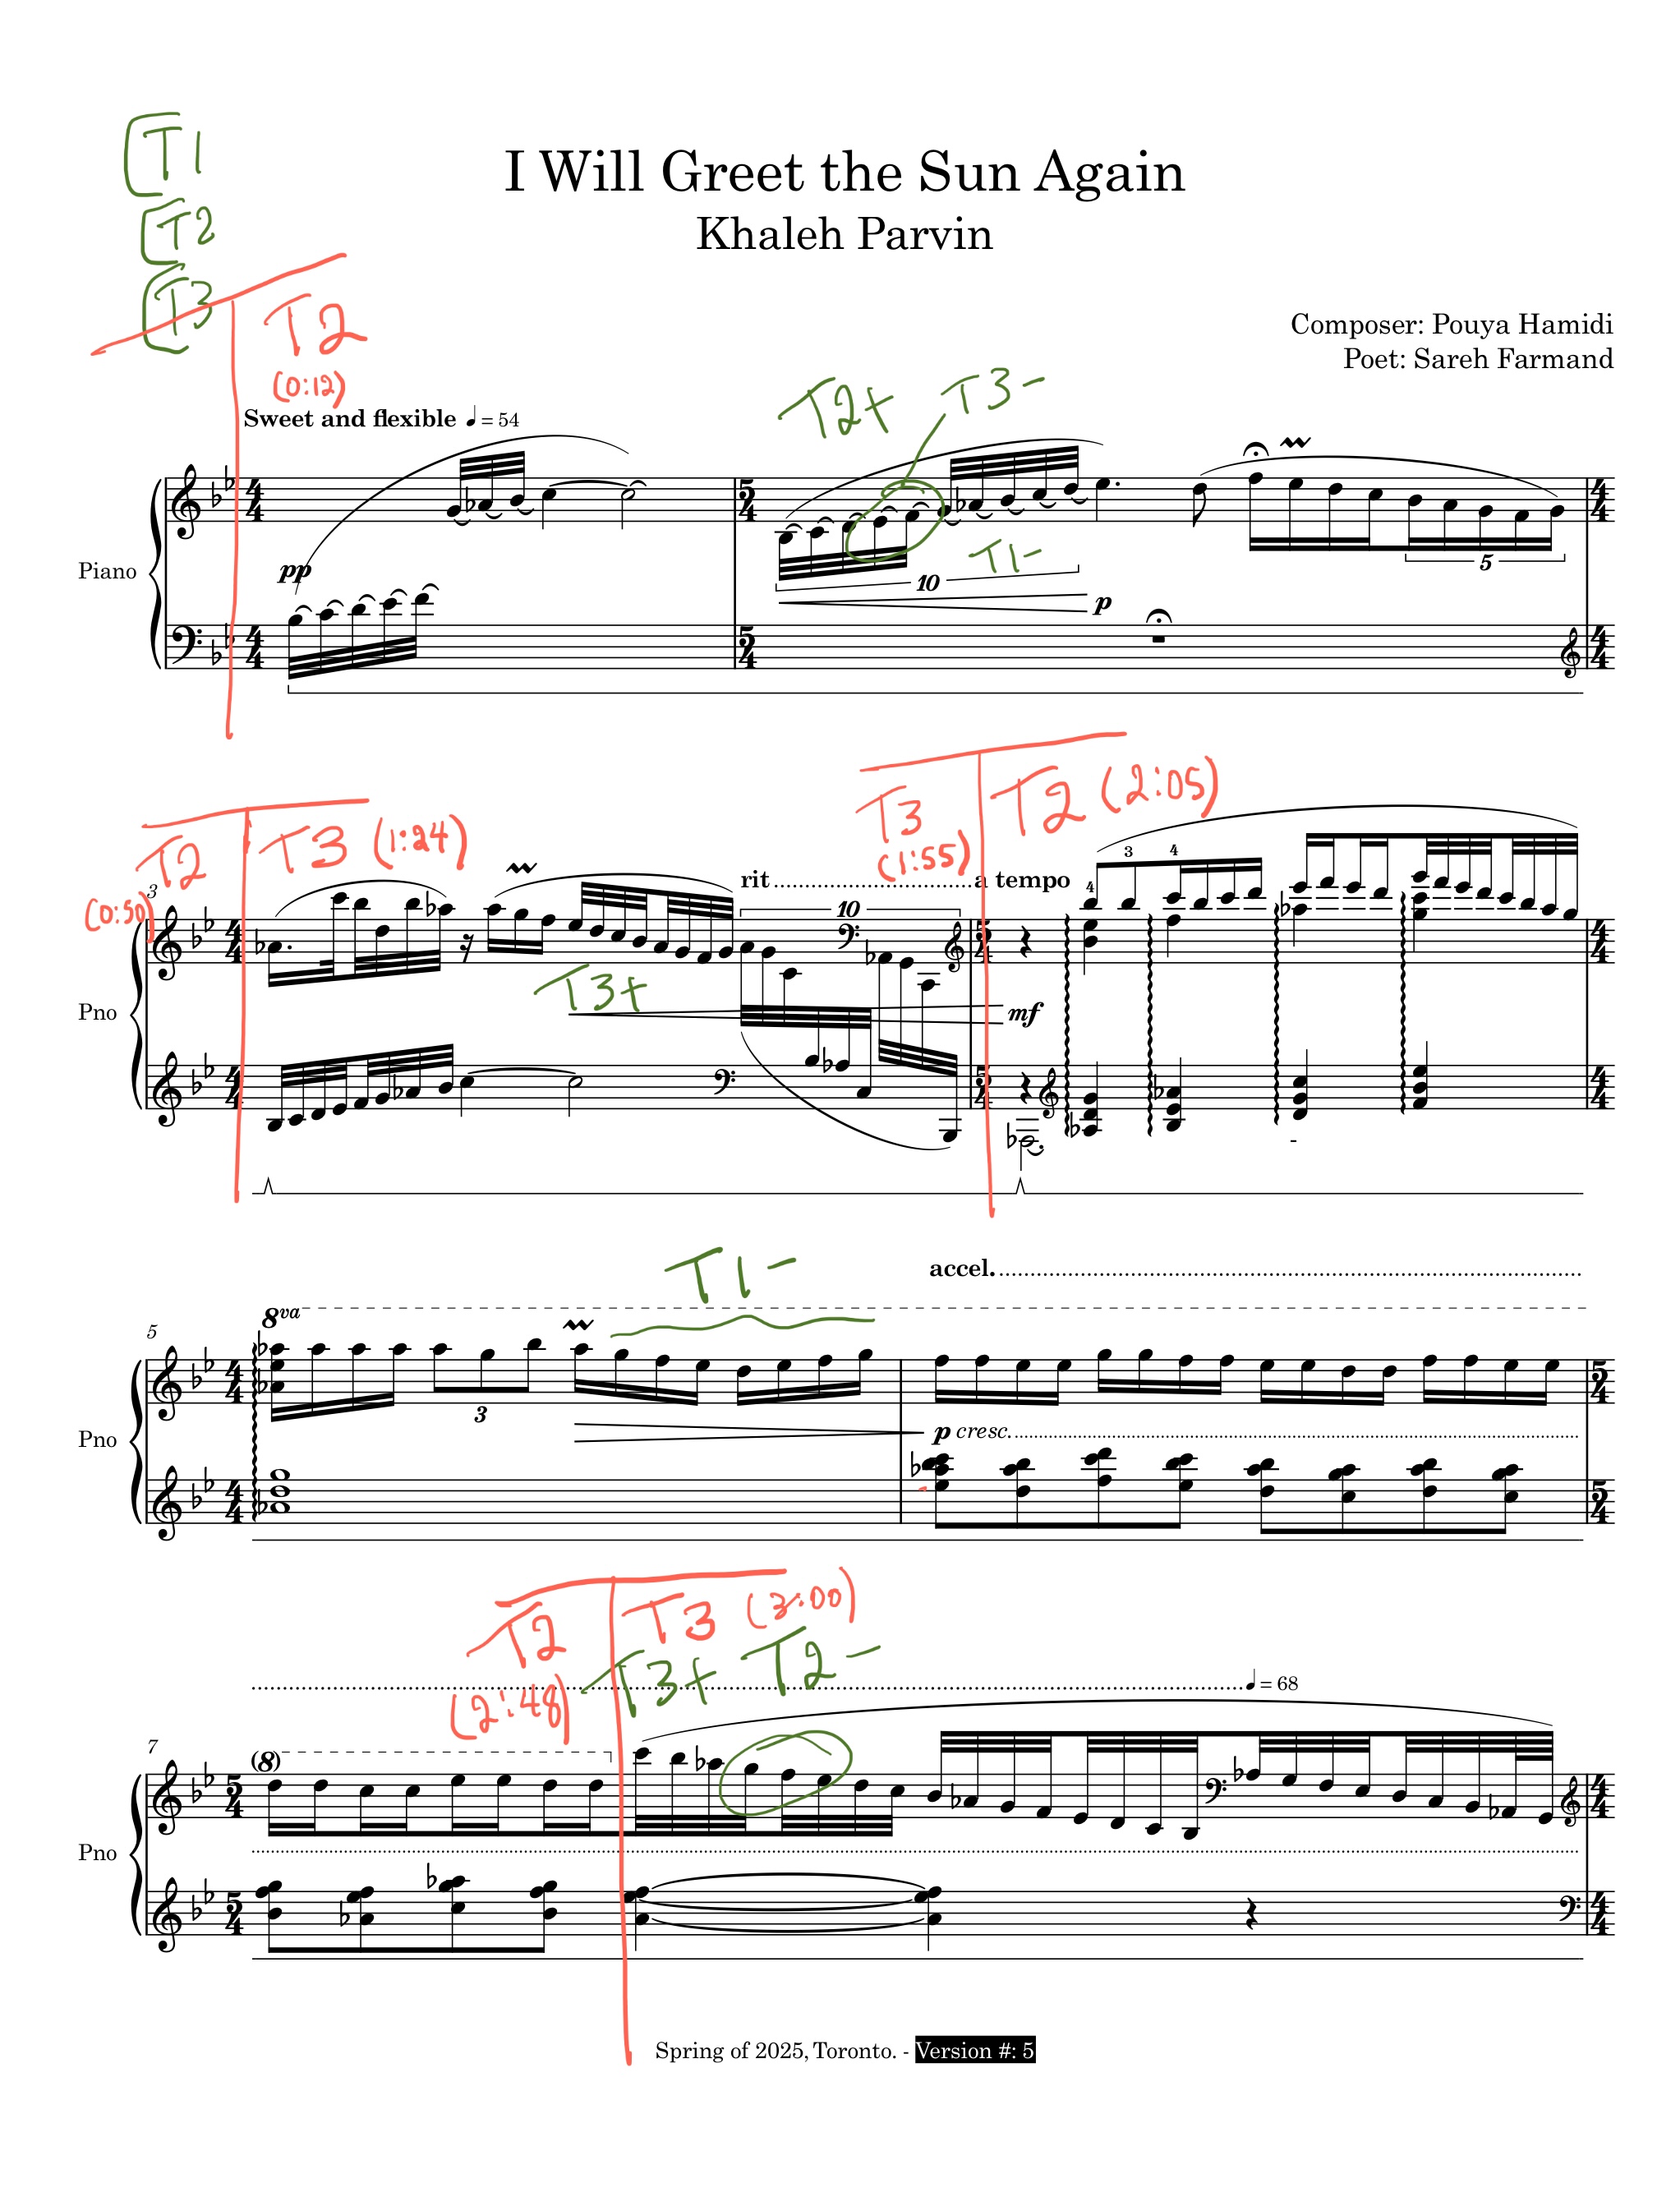
Video walkthrough of a marked up edit plan score:
Spreadsheet edit plan:
The written edit plan table is a little more straightforward to explain. One of the best ways to express this is in the form of a spreadsheet. It comes premade as a table and can have automatic formatting and numbering. Using a table format instead of a score PDF has some drawbacks. Mainly that there is a separation from the score itself. However, for simpler projects and edits, this is the most efficient way. Naturally the typed data can be clearer to read than handwritten ones in the score. Moreover, sharing annotated PDFs by email or other digital means requires more data and greater technical proficiency. Here is an example of a edit plan in the form of a spreadsheet.
- Column A: indicates the take number
- Column B: indicates the timing of the audio take
- Column C: the bar/beat number of where to cut
- Column D: any performance notes to consider
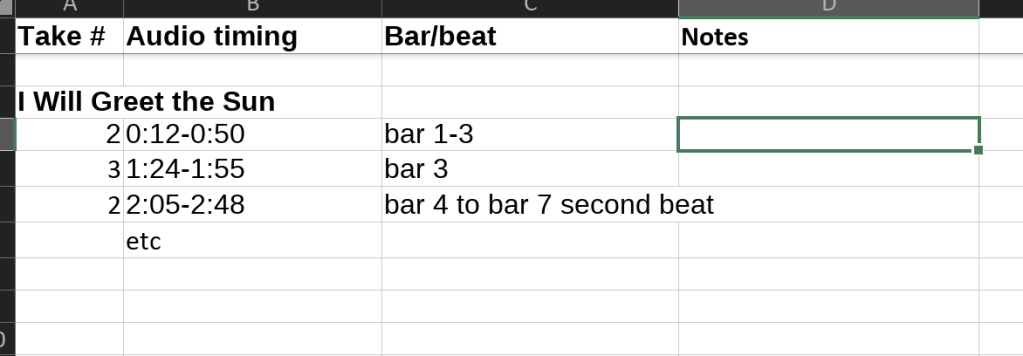
Below is a link to an excel sheet document where you can download and use freely. Using an online service such as Google Drive or OnlyOffice especially in multi personnel scenarios is highly recommended as the files are updated in realtime with multiple users able to refer back to the latest version. You can simply enable Sharing to others and send the link to the applicable people.
Link to the example editing spreadsheet: https://docspace-lltugb.onlyoffice.com/s/yTcRxfJHtgbns_j
BONUS TIP 1: What to consider when the project involves video as well.
I’ve done many recordings with various video teams and methods over the years. If the recording is done with a video team, it is advisable to request less edits. This is because there is a double layered process involved. Every single edit that is done in audio (with the exception of micro audio edits), needs to be replicated in the video world and hence the audio edits need to be meticulously documented by the engineer. Audio and video software do not talk to each other nicely and the work still needs to be done manually. It is advisable in advance to check in with the audio and video team to make sure the requested edits are still within the project’s scope and budget.
There are special cases where a surgical micro audio edit can be performed. This could be one note or as much as a bar (if the tempo is fast) that is replaced only in the audio domain. In this scenario, it is possible to do just a micro edit with audio and leave the video visually the same take.
BONUS TIP 2: What takes can you edit together?
Not everything is possible!! It’s easy to assume that advances in technology make anything achievable, but even with today’s computing power and creative techniques, some things remain out of reach. Here are a few examples:
- Sustained instrument underneath a take. An example is two different takes where a piano is holding a chord underneath and a few notes of another instrument needs to be changed on top and again back to the original take. If the sustained chord is played differently, the edit will be noticeable.
- Not enough sound before the cut is there. It is important that during the recording session, if a bar or section of music needs to be fixed on its own, to start at least 1 or 2 bars earlier. When cutting exactly on the music that has no music beforehand, the first note will sound unnatural as there is no acoustic resonance from the previous bar to make it feel like a continuous performance.
- Too drastic of a difference in dynamics between the takes. If one take was played for example loudly and another softer and the difference is drastic enough, then it is nearly impossible to edit them together. Even by increasing the gain of the other take, the timbral differences will be noticeable.
Hopefully this has been helpful. Feel free to get in touch with any questions/comments. Always happy to hear from you.
Pouya
Discover more from Pouya Hamidi
Subscribe to get the latest posts sent to your email.

One thought on “Guide to creating an effective editing plan document”